Jobsite Prep Tips
2 February, 2023


2 February, 2023
You’re all ready to get started, but when you get to your client’s house, you find toys, children and pets all over the floor and fresh ketchup on the walls — and are they really telling you to put your products and equipment on their 17th-century hope chest? Before you start surface prep, there’s job site prep: getting the work area ready so you can work safely and efficiently. We asked a few contractors, both residential and commercial, to describe their process.
While it’s important to respect the customer’s property, it’s also important, say our contractors, to set up expectations. Don’t be a doormat — make sure the client holds up their end of the deal in getting the property ready for your arrival.
Keep it looking Brand New
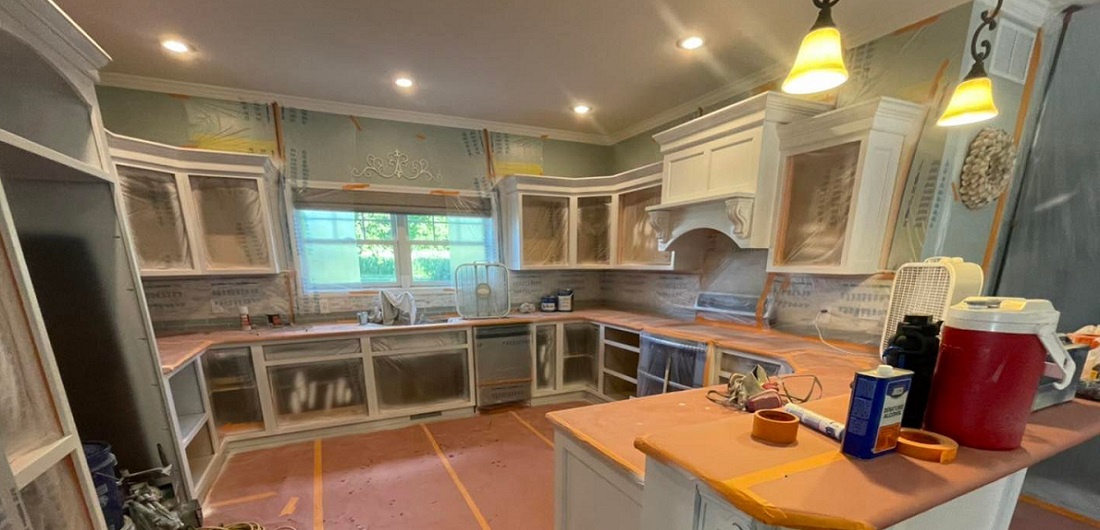
Brandon Smith is owner of Brand New Again Refinishing in Bismarck, Illinois, just an afternoon hike away from the Indiana state line. Most of his work is in finishing or refinishing cabinets so that when he’s done, they’ll look just like his company name suggests — brand-new again. Before he gets started finishing, he encourages the homeowners to get the area ready by referring them to a checklist on his website. It suggests emptying and cleaning cabinets, doors, and drawers; making sure molding or corner rounds are installed and new hardware is available; and getting the stove, dishwasher and microwave out of the way. (Well, at least they know he’ll bring his own lunch.) The most important thing in jobsite prep, he says, is building trust with customers ahead of time and keeping that trust throughout so they’re not afraid to give their kitchen over to Smith and crew.
Now, time to unpack. “The first thing we do when arriving is check in with the client and get a lay of the land,” he said. “Then we unload all the tooling we will need out of our work trailer into the kitchen and the client’s garage, making room for the cabinet doors that will be coming in shortly after. All tooling is organized in a three-tier bin that rolls like airport luggage.”
After that, they start to clean the area and label any parts and gizmos that need to be moved or removed. “Our system involves covering/prepping floors and counters, then going into cabinet door labeling and removal,” he said. “We wipe the countertops and sweep the floor. Outside of that, my clients should have addressed everything on the checklist to make job startup run smoothly.”
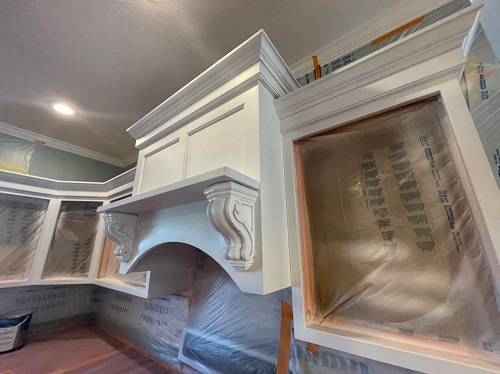
Fortunately for Smith, he loves the prep. “Prepping openings is a highlight for me,” he said. “Once cabinet doors are removed, we are left with an open area we must cover to avoid paint getting inside the cabinets. A lot of finishers apply the tape, sticky side facing out, directly onto the back of the cabinet frame. After shooting several coats of primer and paint, then removing said tape, they are usually left with a sharp or rough edge giving the appearance that the cabinets were painted.”
Long story short, that doesn’t look brand-new. “We like to line the inside of the cabinet walls, ceiling and floor with a strip of two-inch tape that goes all the way around,” Smith described. “We then use 3M pre-taped plastic directly over top of that tape and trim and tape all edges down. This keeps the tape and plastic back off the cabinet frame, so when this prep material is pulled, you cannot tell the cabinets did not come from the factory that way.”
As important as it is to prep, the client might be more concerned about how things look when you roll out. Just like you don’t want to pick up after them, they most likely don’t want to pick up after you. “We make sure the area is cleaner than when we arrived,” Smith insists. “Not only will the client have a new cabinet color with all prep material removed by the second day, they will also have a clean kitchen.”
But there’s always room for improvement. How? “I listen to my clients … and my wife!”
Dr. Prepper

Devin Nolan climbed on board for this article because the topic is near and dear to him. “I pretty much consider myself a prepper more than a refinisher because I believe that prep is key to a great finish,” he said. He’s developed a system of checklists and repeatable procedures to make sure everyone, no matter when he hired them, gets it done the right way. Nolan’s company, Buckeye Painting in El Dorado Hills, California, focuses on cabinets, and he shared how he gets the area ready:
He also makes sure the customer has a checklist of their own. “In my opinion, the most important thing for us is setting up expectations with the client. We always communicate to the homeowner that we are not movers, we’re painters. We ask them to move their refrigerator and all items from their drawers. I also give them a rundown of what to expect while we’re in the home. This includes our prep and painting process and how long we think we’re going to be in there. We don’t give hard, set deadlines, but we do provide daily updates.”
Nolan likes to find a place to lay out tools, products and equipment to see what he has or doesn’t have. “I like staging our tools and materials in a location of the home. Organization is very important to a successful project, and I don’t want to spend time looking for things,” he said. “We’re big fans of empty garages and will always lay something down to protect the floor before we set anything down.”
From there, it’s on to setting up a safe work environment, again keeping the customer in the loop. “Since we are working the interior, it’s an absolute must that we have a good containment system,” said Nolan. “We communicate to the client that when we take over their kitchen, mudroom, bathroom or hallway, that it’s a work zone and everyone should take caution when entering or exiting.” Children and pets need to be kept out for the safety of the crew and the residents. And like any painting celebrity, he’s got fans. “For our own safety, we filter the air with industrial fans with filters to collect dust and paint particles. We turn off the water heater, block the vents and make sure the air conditioning is off when we’re spraying.”
Once the job is done, they put it back the way they found it. Or better. “We’ll put on new bumpers, make sure our hinges and doorknobs are clean or new, and reinstall the doors,” he said. “From there, we’ll remove all of our masking, sweep, vacuum and remove floor masking last.” And on the way out, they take out the garbage.
Document the process!
Weston Spivey hails from Slocomb, Alabama, where he is the District One commissioner for Geneva County and owner of Spivey Heating & Air, Premier Painting and Premier Construction & Contracting. This busy young man has had quite the experience bringing crews into people’s homes under many different circumstances.
Just like when you rent a car, Spivey suggests you document the condition of the house so that as much as trust and honor are involved, your customer doesn’t sue you to replace something they scratched up 16 years before you got there. “The first thing that needs to be done when arriving to a job site is a very thorough walk-through,” he said. “I always take my cellphone and document preexisting damage — for example, issues with windows, dead plants, missing shingles, landscape, etc. If this is an interior project, I recommend you document damage to furniture, flooring, etc. before beginning. Most smartphones show date and time, and this will allow you to protect yourself against a customer who might accuse you falsely of wrongdoing.”
Then there’s the dog. Sure, you can put up a meme with your dog saying, “It’s my house, not yours,” but your customer needs to make arrangements to keep Fido, Rover or Tiffie safely out of the way during the project. “I recommend having very clear language in the scope of work or contract that dogs need to be put away during your time on the job,” said Spivey. “Animals can pose danger if you are working on the home while the homeowner is away, due to their anxiety of mistaking you for an intruder.”
It’s also important that the client understand this might take a minute, so they don’t come home the first day and wonder why it’s not finished. “I expect the homeowner or business owner to understand a successful paint job is a process,” said Spivey. “I have found a lot of owners want to judge the job quality before completion. They don’t understand the process, and they try to get involved in your process of cleaning, prepping and two-coating, or simply not understanding that touch-up is done before the final walk-through. I recommend all contractors keep control of the project and encourage the customer not to judge the job until it’s ready for final inspection.”
“Hey, can you move that 17th-century hope chest into the hallway?” No, and for so many reasons, says Spivey. For one, you risk damaging the furniture — even slightly — and being responsible for repair. For two, you risk damaging your painter, even slightly, and being responsible for treatment. “The key to success in business is keeping your liability low,” said Spivey. “Don’t risk moving a piece of furniture and it not looking the same after you touched it and then finding out it’s worth twice the amount of your job.”
Now organize, and make sure someone keeps track of said organization. “Have a competent person on the job who knows how to keep the job site in functional order,” he suggested. “If you have a larger company, you need someone other than yourself who can call shops and run a clean job site.”
Finally, cleanup. This is as, if not more, important than setup to keep your customer happy for years to come. All they need to see when you’re out the door is a great paint job; they don’t need to know that your crew likes smoothies, slushies or Hardee’s. “When my crew leaves, I expect the job site to be cleaner than it was when we arrived,” said Spivey. “I recommend utilizing a weed blower if the customer has a dirty sidewalk or leaves on the porch that need removing after a successful exterior project. If this is an inside project, I recommend leaving the rooms deep-cleaned with a product that has a delightful scent. These things take minimum time and turn happy customers into influencers.”
Need more advice? Ask around. Talk to other contractors about how they do it, talk to customers about what they did or didn't like about the prep or cleanup process. “The right customers will give you successful tips you can implement that will skyrocket your success,” said Spivey.
Ready for, and from, day one
Noah Quest is the project manager/director of operations at SPI (Shamrock) Painting in Denver, Colorado, an over 30-year-old company that focuses on new construction and commercial painting. The company paints facilities such as tech industry offices, luxury boutique hotels, country clubs and more. Quest was excited to get this assignment, and if you can roust up a guy who gets excited about jobsite prep for an article about that very topic, you are lucky indeed. Much of Quest’s pre-project procedure is based on trying to make sure that when the crew gets to work, everything is ready: product is in place, the managers and foremen know what’s going to happen, and time isn’t wasted. Plus, keep track of things going in and going out so you know what needs to be repaired or replaced for the next go-round. We’ll let him take it from here.
For us, the most important thing in getting our jobsite ready is making sure we have all the information in the field team’s hands. We have what we call a “transfer” meeting with our superintendent, foreman and project manager/ estimator. This meeting involves sharing the plans, often highlighted by the PM with key points and notes to look for.
We also share hour-tracking sheets, which line out how many hours we have for each substrate by coat, so the field knows exactly what we have included. Along with that, we fill out a “transfer sheet,” which notes inclusions and exclusions and builds upon the hour-tracking sheet to make sure the field team has a clearly defined scope of work with no guesswork.
Next, we come up with our mobilization plan. The first thing we discuss is what equipment and material are necessary to complete the work. We create a material/equipment sheet, so we know what is being taken to the job site. This includes items such as paint sprayers, lift equipment, ladders, carts, fans, masking material and more. We refer to the sheet at the end of the project to make sure everything comes back. Having this plan in place makes for a much more productive first day on the project, as we don’t have to waste time on day one running back and forth from the shop grabbing equipment.
We also discuss how we’re going to get all the above items to the project to make sure we do not double up on management staff on-site. For example, if the superintendent is meeting there on opening day, he will bring all the material. If he is planning on arriving later in the day, we coordinate with our shop manager to have this all delivered. This ensures all material and equipment are on-site for our foreman and field team when they arrive, so there is no delay at the outset.
The last part of the planning process is to have our superintendent visit and meet with the GC superintendent to walk the project and make sure everything is ready for our painters to begin. Too often we are called to a project when it is not actually ready, so we have found that by making this meeting a priority we reduce wasted mobilizations.
Now, on to the first day
Then, on to the last day
A lot of this procedure came from consulting with the team after a project, when both the wins and the wounds of the worksite are still fresh, said Quest. “I generally ask our foreman, ‘What annoys you about the first day or days on a project?’ Typically, their answers will tell you about bottle neck time-wasting items. One big thing that always came up was ‘trying to figure out what to paint and what not to,’ which led us to implement our transfer meetings,” Sometimes things would get painted that weren’t in the contract, meaning it was work done for free. Other times, the team wouldn’t realize something needed to be painted, and would have to go back, re-tape, remask, and spend a lot of time and money doing things out of sequence.
Issues like that were why they developed the transfer meeting. “Too often our PM’s/estimators were stopping what they were doing to answer scope questions on the fly. The stop and start of work (bids, change orders, etc) was becoming an issue. To mitigate this, we decided to start these meetings to get more information to the field before it came up,” said Quest.


Add new comment